Canva Design: How to create blog post bannners with Canva
Many people try to design using a easy to use design tool, but to no avail. This is not because graphic design is difficult but they don't know how to go about it.
In this post we would be discussing how to design blog banners with canva.
Canva is an easy to use graphic design application software that provides numerous design features (Templates & Elements) to users.
Is it Free or Paid
Canva has both the free and paid version. The free version as you may have already guessed is limited in scope.
Canva paid version(I.e pro version) Enable users free access to unlimited ready made designs.Differences between Canva Free Version & Paid Version
Resizing: When designing a blog banner either with the use of a template or drag and drop elements, resizing is only possible when you are using the paid version.
i.e Free version does not support the resizing of designs.
Templates & Elements: Another great difference between Canva's free and paid version is that;
Free version does not allow you full access to all it's templates and elements needed to carry out your design. This is because most templates and elements belongs to the pro or paid version.
The paid version gives you full access to all it's Templates and Elements.
The pro version goes for about $7 per month.
Canva is specifically designed for ease of use. This design tool is embedded with over 22 design categories with their respective templates.
It provides easy designs in Mobile video design and editing, Social media posts, logo design, phone wallpapers, Business card, certificates, presentations, Slidder design, book cover design and blog banners.
see also: Nigeria Electric VechilesHow to design a blog banner with canva
First and foremost, to design a blog banner.
1. Go to canva.com
2. Search for banner as shown below.
3. Select blog banner as shown below.
There are two major ways to design a good blog banner;
1. By Customizing a Template
2. By Drag and drop elements.
Method 1
A template is a group of elements and texts forming a complete design which are not permanently joined together.
Almost every element in a template can be reshaped, repositioned, recolored or deleted.
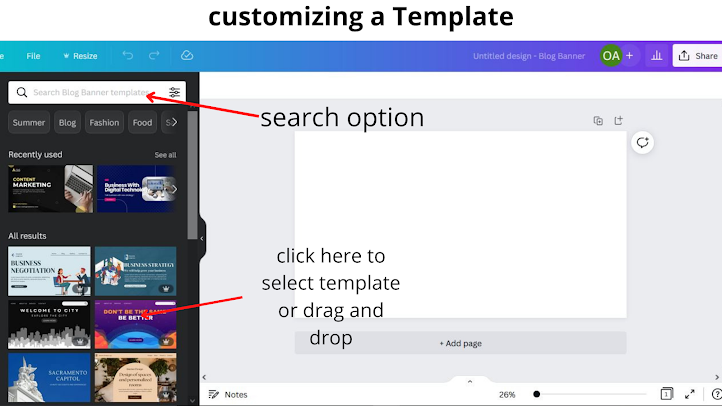
To customize a template, you need to use the search function. Let's say you want to design a blog banner for
" 1 hour Blogger setup"
1.Search for blogging templates and customize your preferred template.
Your search should center around Blogging. A good way to start is to type "blog" into the search function.
NOTE: Every part of a element can be Customized.
2. Left click with your mouse and edit it to your taste.
How to Resize a blog banner & Template & Element
Blog banners & Template
1. Left click on the blog banner or template.
2. Select Resize at the Top left corner and choose your preferred size.
Element
1. Left click on the element
2. click and hold any of the four nodes of the element to increase or reduce it size.
How to Change colours
2. Click on the color icon on the top left corner of your interface.
1. Click on the text icon on the left side of your design page.
2. Edit your heading, subheading and body text.
Elements and text are usually deleted in the same manner on Canva.
1. Left click on the element or text
2. click on delete.
Method 2
Dragging and dropping of Elements
1. Click on Elements
2. Search for your desired elements
3. Select or Drag and drop the element on the design page.
Canva Ctrl Keys
The three major keys in canva design page are;
Ctrl C : To copy
Ctrl V : To Paste
How to Download your design
1. Click on the share on the top right corner of your Canva home page.
2. Select download
3. Choose your preferred file type
4. Click on download.
Conclusion
Canva is a great design tool for beginners. This Article gives a directive on how to use canva as a beginner.
It covers; Customizing a template, designing with an element, how to resize your design, how to add text, how to change colors, how to delete an element, canva ctrl keys and how to download your design.
Kindly leave a comment below to share your thoughts on this article.


Comments